Developer Guide
- Acknowledgements
- Setting up, getting started
- Design
- Implementation
- Documentation, logging, testing, configuration, dev-ops
- Appendix: Requirements
-
Appendix: Instructions for manual testing
- Launch and shutdown
- Adding a student
- Adding of grade progress to student
- Adding homework to a student
- Updating lesson plan of a student
- Editing a student
- Viewing a student
- Showing a schedule of a day
- Removing field from student
- Marking a student
- Unmarking a student
- Deleting a student
- Next Session feature
- Adding of attendance to student
- Adding of session to student
Acknowledgements
- This project is based on the AddressBook-Level3 project created by the SE-EDU initiative.
- Libraries used: JavaFX, Jackson, JUnit5.
Setting up, getting started
Refer to the guide Setting up and getting started.
Design
.puml files used to create diagrams in this document can be found in the diagrams folder. Refer to the PlantUML Tutorial at se-edu/guides to learn how to create and edit diagrams.
Architecture
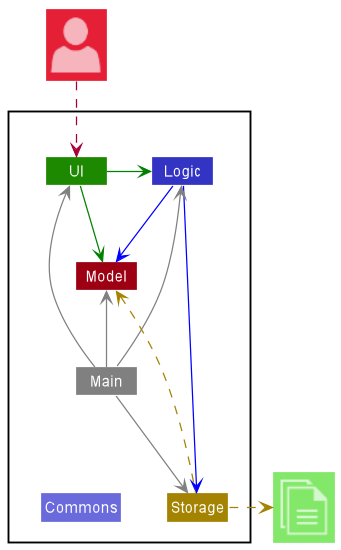
The Architecture Diagram given above explains the high-level design of the App.
Given below is a quick overview of main components and how they interact with each other.
Main components of the architecture
Main has two classes called Main and MainApp. It is responsible for,
- At app launch: Initializes the components in the correct sequence, and connects them up with each other.
- At shut down: Shuts down the components and invokes cleanup methods where necessary.
Commons represents a collection of classes used by multiple other components.
The rest of the App consists of four components.
-
UI: The UI of the App. -
Logic: The command executor. -
Model: Holds the data of the App in memory. -
Storage: Reads data from, and writes data to, the hard disk.
How the architecture components interact with each other
The Sequence Diagram below shows how the components interact with each other for the scenario where the user issues the command delete 1.
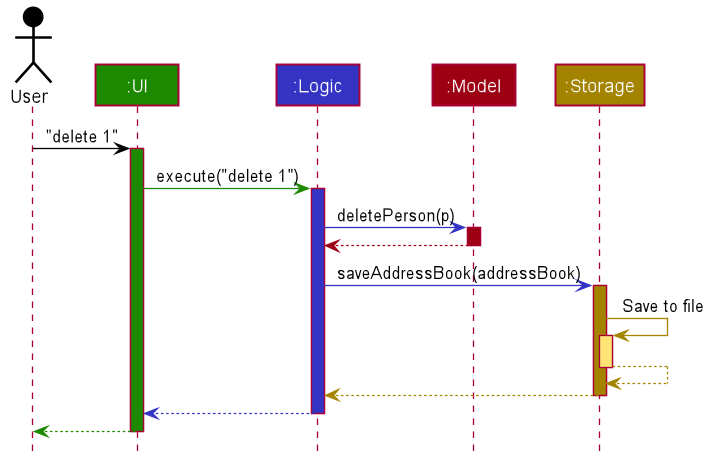
Each of the four main components (also shown in the diagram above),
- defines its API in an
interfacewith the same name as the Component. - implements its functionality using a concrete
{Component Name}Managerclass (which follows the corresponding APIinterfacementioned in the previous point.
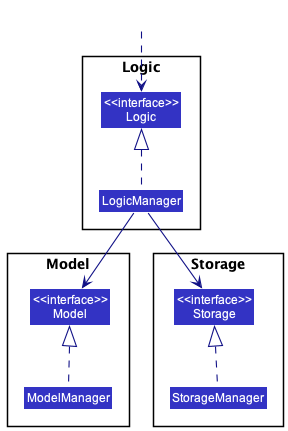
For example, the Logic component defines its API in the Logic.java interface and implements its functionality using the LogicManager.java class which follows the Logic interface. Other components interact with a given component through its interface rather than the concrete class (reason: to prevent outside component’s being coupled to the implementation of a component), as illustrated in the (partial) class diagram below.
The sections below give more details of each component.
UI component
The API of this component is specified in Ui.java

The UI consists of a MainWindow that is made up of parts e.g.CommandBox, ResultDisplay, PersonListPanel, StatusBarFooter etc. All these, including the MainWindow, inherit from the abstract UiPart class which captures the commonalities between classes that represent parts of the visible GUI.
The UI component uses the JavaFx UI framework. The layout of these UI parts are defined in matching .fxml files that are in the src/main/resources/view folder. For example, the layout of the MainWindow is specified in MainWindow.fxml
The UI component,
- executes user commands using the
Logiccomponent. - listens for changes to
Modeldata so that the UI can be updated with the modified data. - keeps a reference to the
Logiccomponent, because theUIrelies on theLogicto execute commands. - depends on some classes in the
Modelcomponent, as it displaysPersonobject residing in theModel.
Logic component
API : Logic.java
Here’s a (partial) class diagram of the Logic component:
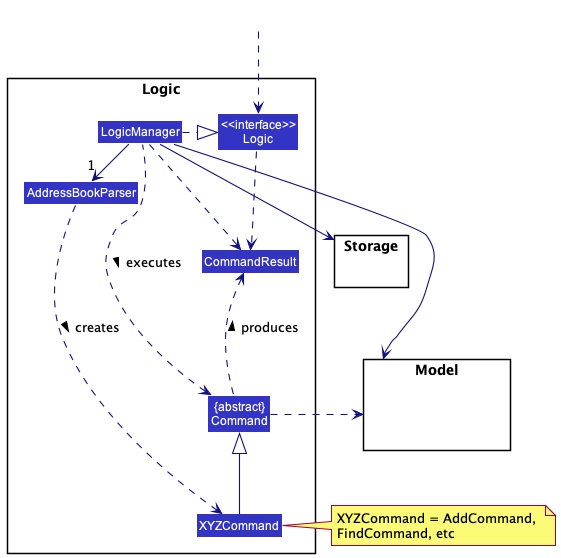
How the Logic component works:
- When
Logicis called upon to execute a command, it uses theAddressBookParserclass to parse the user command. - This results in a
Commandobject (more precisely, an object of one of its subclasses e.g.,AddCommand) which is executed by theLogicManager. - The command can communicate with the
Modelwhen it is executed (e.g. to add a person). - The result of the command execution is encapsulated as a
CommandResultobject which is returned back fromLogic.
The Sequence Diagram below illustrates the interactions within the Logic component for the execute("delete 1") API call.

DeleteCommandParser should end at the destroy marker (X) but due to a limitation of PlantUML, the lifeline reaches the end of diagram.
Here are the other classes in Logic (omitted from the class diagram above) that are used for parsing a user command:
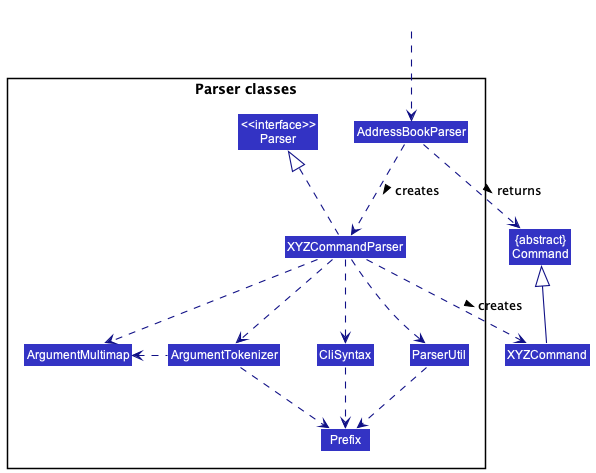
How the parsing works:
- When called upon to parse a user command, the
AddressBookParserclass creates anXYZCommandParser(XYZis a placeholder for the specific command name e.g.,AddCommandParser) which uses the other classes shown above to parse the user command and create aXYZCommandobject (e.g.,AddCommand) which theAddressBookParserreturns back as aCommandobject. - All
XYZCommandParserclasses (e.g.,AddCommandParser,DeleteCommandParser, …) inherit from theParserinterface so that they can be treated similarly where possible e.g, during testing.
Model component
API : Model.java
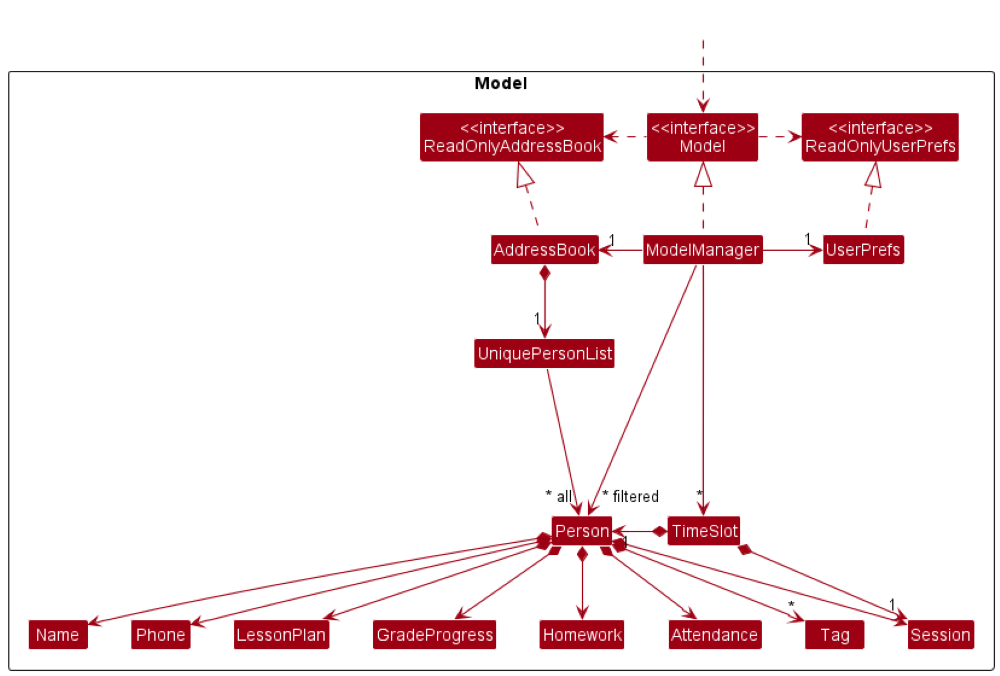
The Model component,
- stores the address book data i.e., all
Personobjects (which are contained in aUniquePersonListobject). - stores the currently ‘selected’
Personobjects (e.g., results of a search query) as a separate filtered list which is exposed to outsiders as an unmodifiableObservableList<Person>that can be ‘observed’ e.g. the UI can be bound to this list so that the UI automatically updates when the data in the list change. - stores a
UserPrefobject that represents the user’s preferences. This is exposed to the outside as aReadOnlyUserPrefobjects. - does not depend on any of the other three components (as the
Modelrepresents data entities of the domain, they should make sense on their own without depending on other components)
Tag list in the AddressBook, which Person references. This allows AddressBook to only require one Tag object per unique tag, instead of each Person needing their own Tag objects.
Storage component
API : Storage.java
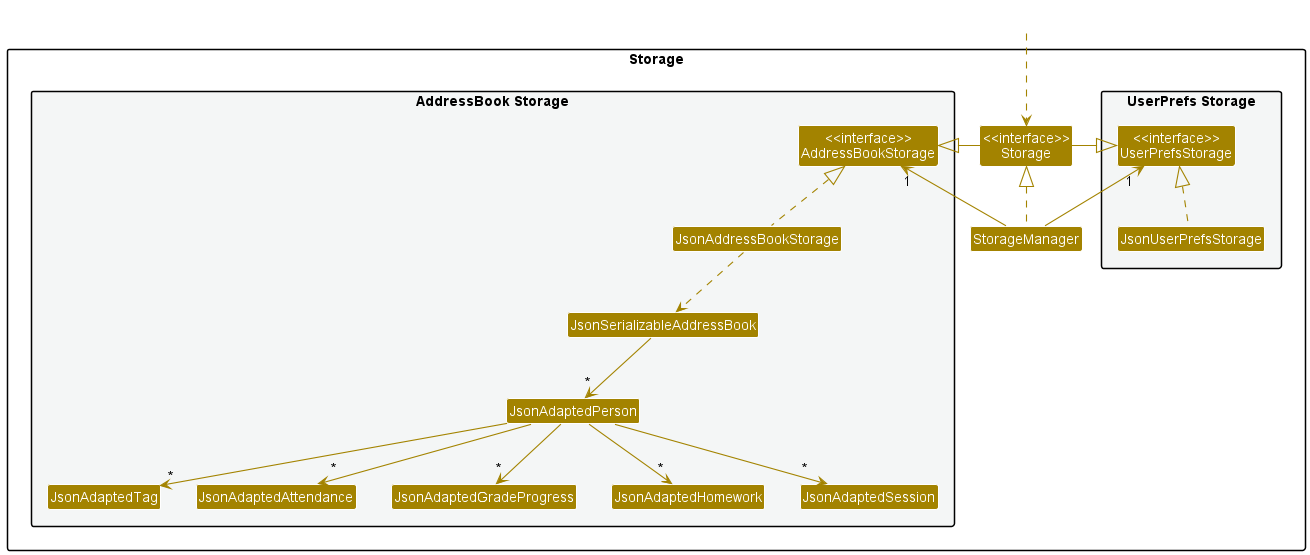
The Storage component,
- can save both address book data and user preference data in json format, and read them back into corresponding objects.
- inherits from both
AddressBookStorageandUserPrefStorage, which means it can be treated as either one (if only the functionality of only one is needed). - depends on some classes in the
Modelcomponent (because theStoragecomponent’s job is to save/retrieve objects that belong to theModel)
Common classes
Classes used by multiple components are in the seedu.addressbook.commons package.
Implementation
This section describes some noteworthy details on how certain features are implemented.
Lesson plan feature
Implementation
The lesson plan feature allows the user to keep track of a lesson plan for a person in the form of a string. It is a required parameter when a new person is added, through AddCommandParser.
It can also be added independently, and is facilitated by LessonPlanCommand in the Logic component. It extends Commmand with a LessonPlan object stored internally.
LessonPlanCommand is created by LessonPlanCommandParser which implements Parser<LessonPlanCommand>.
Each Person has a LessonPlan object which contains a string value with the Lesson Plan.
Given below is an example usage scenario and how the lesson plan feature behaves at each step.
Step 1. The user launches the application for the first time. The address book will be initialized with the initial address book state.
Step 2. The user executes lessonplan 1 lp/Biology to overwrite the lesson plan of the first person in the address book.
The following sequence shows how adding a lesson plan works:
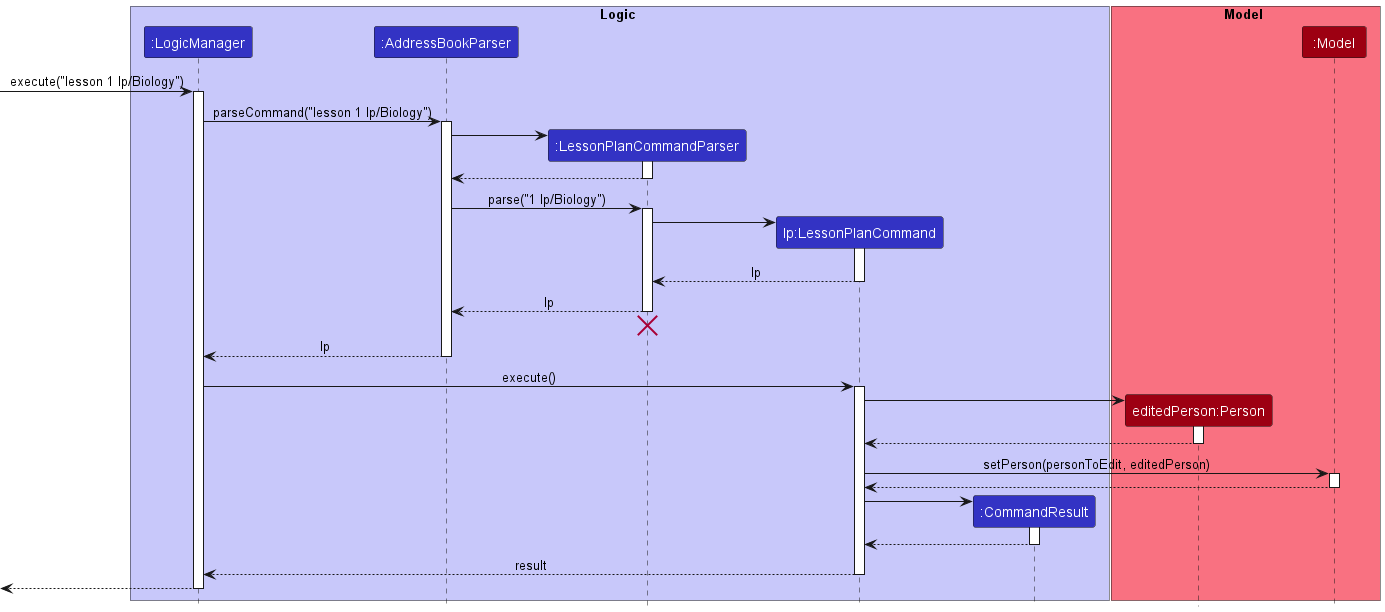
LessonPlanCommandParser should end at the destroy marker (X) but due to a limitation of PlantUML, the lifeline reaches the end of diagram.
Homework Feature
Implementation
The homework feature is facilitated by HomeworkList and Homework.
Each Person has a HomeworkList which contains multiple Homework objects. Below is a partial class diagram of the relationship:

HomeworkList implements the following operations:
-
HomeworkList#addHomework(Homework)— Adds a homework task to the homework list. -
HomeworkList#editAtIndex(Index)— Replaces the homework at the given index with a new homework. -
HomeworkList#clearList()— Deletes all items in the homework list.
These operations are exposed in command executions such as HomeworkCommand#execute() and EditCommand#createEditedPerson().
HomeworkList#clearList() is used for testing purposes only.
Given below is an example usage scenario and how the adding homework mechanism behaves at each step.
Step 1. The user launches the application for the first time. The address book will be initialized with the initial address book state.
Step 2. The user executes homework 1 h/Maths worksheet to add homework to the first person in the address book.
The homework command calls HomeworkList#addHomework(Homework) and adds the task to the list.
The following sequence shows how adding homework works:
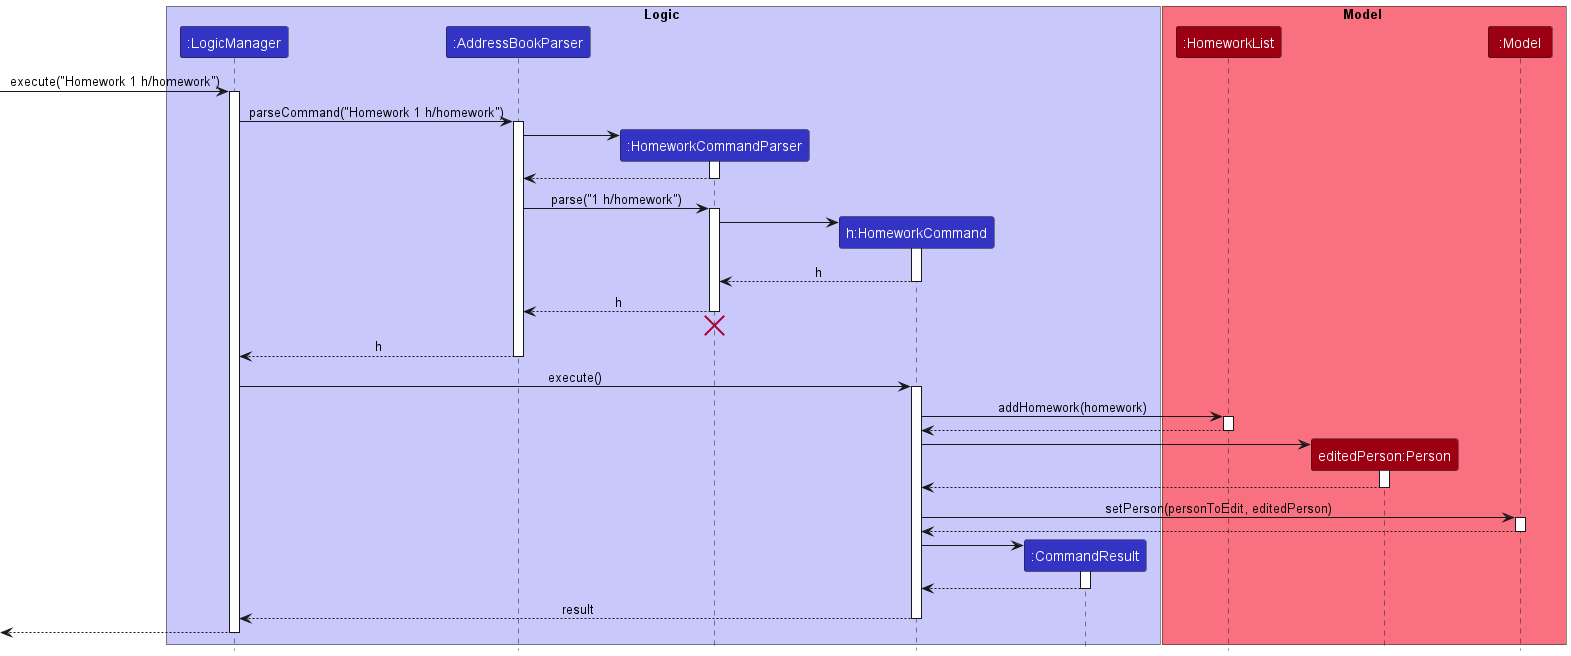
HomeworkCommandParser should end at the destroy marker (X) but due to a limitation of PlantUML, the lifeline reaches the end of diagram.
Step 3. The user decides to edit the homework to Science instead of Maths.
They go into full view mode with the view command and execute edit 1 h/Science worksheet, which calls HomeworkList#editAtIndex() and replaces the old description with the new one.
Design considerations
Aspect: Format of homework command:
-
Alternative 1 (current choice): Command prefix required.
- Pros: Easy to implement. Consistent with formats of other commands.
- Cons: May seem redundant to type as it can only add one item.
-
Alternative 2: Command prefix not required.
- Pros: Saves time for users during input.
- Cons: May be harder to implement. Inconsistent with formats of other commands.
Grade Progress Feature
Implementation
The grade progress feature is facilitated by GradeProgressCommand, GradeProgress and GradeProgressList classes.
GradeProgressCommand extends Command abstract class that has abstract method, execute().
GradeProgress deals with the actual grade progress inputs while the
GradeProgressList deals with the list of GradeProgress.
The GradeProgressList is the object that is displayed in the AddressBook.
Additionally, the classes implement the following operations:
-
GradeProgressList#addGradeProgress(GradeProgress)- Adds grade progress to the grade progress list. -
GradeProgressList#clearList()- Clears all stored grades of the Person -
GradeProgressList#editAtIndex(index)- Edits the grade at the given index with the new given grade.
Given below is an example usage scenario and how the grade progress feature behaves at each step.
Step 1. The user launches the application for the first time. The AddressBook will be initialized with the sample data.
Step 2. The user executes grade 1 g/Math: B command to insert the grade, Math: B to the 1st Person’s GradeProgressList in the AddressBook.
The GradeProgress command calls GradeProgress#addGradeProgress(GradeProgress) and adds the task to the list.
Step 3. Upon successful entry of grade inputs, the CommandResult() message will be invoked.
Design considerations
Aspect: How grade progress command executes
-
Alternative 1 (current choice): Creates a new
Personobject and overwrites current ‘Person’ object- Pros: Easy to implement and simple understandable code.
- Cons: May lead to performance issues, when contents of the
Personobject is greater.
-
Alternative 2: Include grade progress to the current ‘Person’ object with a setter method
- Pros: Faster, as there is no need to recreate the whole
Personobject - Cons: Implementation details are greatly exposed, damages code’s maintainability
- Pros: Faster, as there is no need to recreate the whole
Aspect: Addition of Grade progress
-
Alternative 1 (current choice): Creation of
Personobject first with emptyGradeProgressListand thereafter executingGradeProgressCommand- Pros: Users would not have to key in a long statement when adding a new
Personto theAddressBook - Cons: 2 command lines to be written for addition of new
Personwith non-emptyGradeProgressList
- Pros: Users would not have to key in a long statement when adding a new
-
Alternative 2: Grade progress to be added during the creation of the new object
- Pros: Reduce the need to recreate new
Personobject for the addition of grade progress - Cons: Increase tendency of user-made errors when inputting longer command lines
- Pros: Reduce the need to recreate new
Aspect: Data Structure of GradeProgressList
-
Alternative 1 (current choice): ArrayList
- Pros: Easy to perform basic functions such as add, delete and remove of respective grade progress elements in the list.
- Cons: Deletion of data from the middle is time-consuming as data needs to be shifted to update the list.
-
Alternative 2: Singly Linked list
- Pros: Insertion and deletion are easier in the linked list. There is no need to shift elements after the insertion or deletion of any element only the address present in the next pointer needs to be updated.
- Cons: More memory is required in the linked list as compared to an array.
The following sequence diagram shows how the grade progress command operation works:
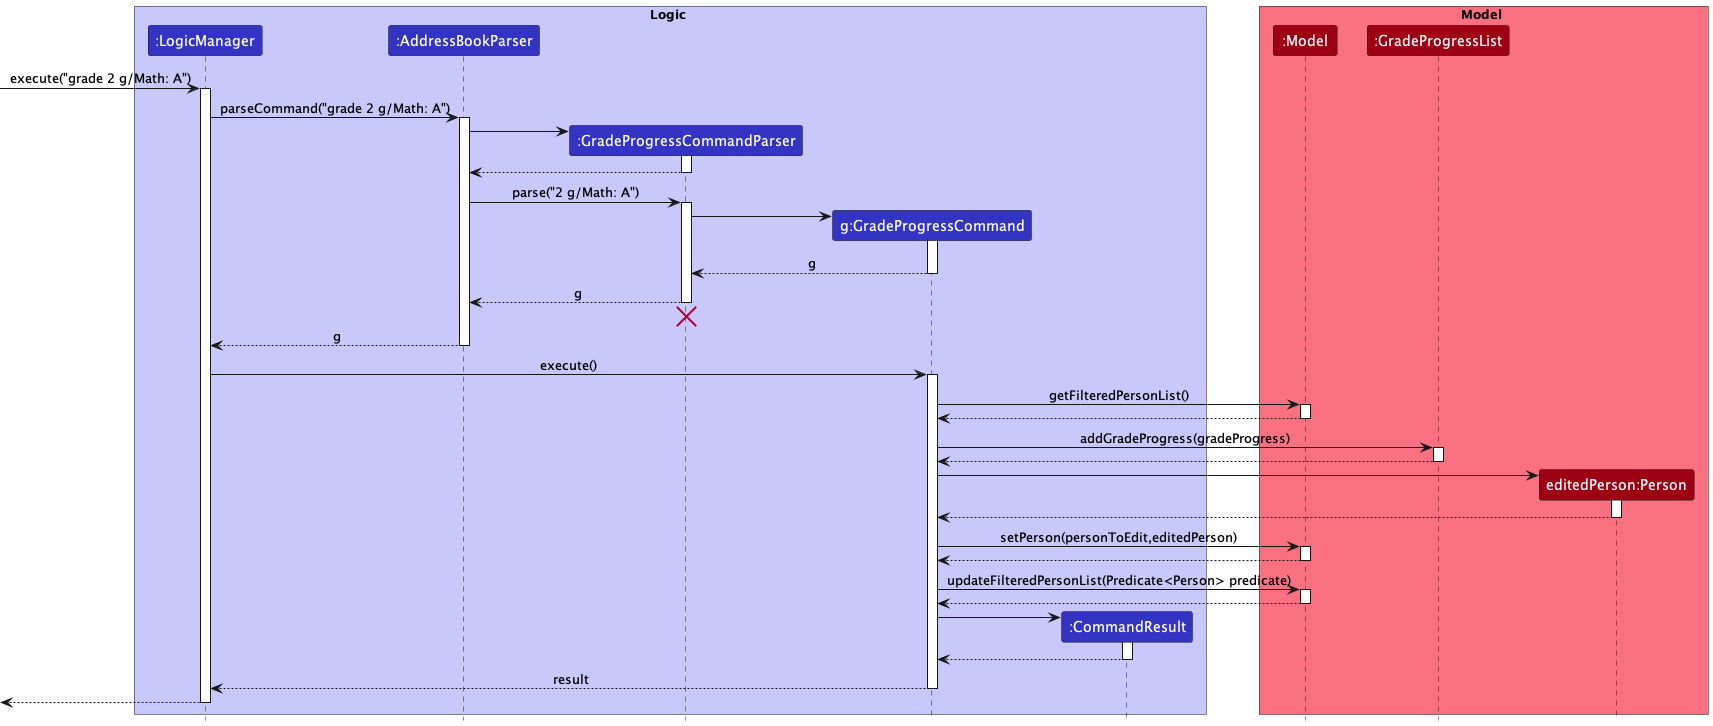
GradeProgressCommandParser should end at the destroy marker (X) but due to a limitation of PlantUML, the lifeline reaches the end of diagram.
Session feature
Implementation
The Session feature allows users of Pupilist to keep track of the session day and start timing of their students represented by the Person class. The Sessions of each student is implemented such that they are stored internally as a Session List specific to each Person.
The Session class implements the Session Objects to be stored in the SessionList and implements the Comparator<Session> Java interface to allow for comparison between Session instances.
It encapsulates the exact string input by the user that is to be used by the Session class to create the instance of Session. It also uses LocalDateTime class to encapsulate the time attribute
associated to each instance of the class. The Session class uses the format EEE HH:mm for the LocalDateTimeFormatter to be used to format the string input to instantiate the time attribute.
LocalDateTimeFormatter requiring enough information to create a LocalDateTime instance, the implementation of Session is such that the LocalDateTimeFormatter will default to its ChronoField.YEAR to be 2000, its ChronoField.MONTH be 1 and ChronoField.ALIGNED_WEEK_OF_MONTH be 1, as a workaround around this issue.
Additionally, it implements the following operations:
-
Session#isValidSession(String test)- Checks whether the string passed by the user is in the valid format to create aSessionObject. -
Session#isValidDay(String test)- Checks whether the day component of the string passed by the user is a valid day of theLocalDateTimeclass. It is a helper method forisValidSession(String test) -
Session#toString()- The specific String representation for theSessionObject. -
Session#equals(Object other)- Compares aSessionobject to an object, only returning true when the other Object is an instance ofSessionwith the specified equality checks with the ‘this’Sessionobject. -
Session#compareTo(Session other)- Compares two instance of theSessionclass for the sorting ofSessionobjects in theSessionList. -
Session#hashCode()- Provides the hashcode of theSessionObject instance.
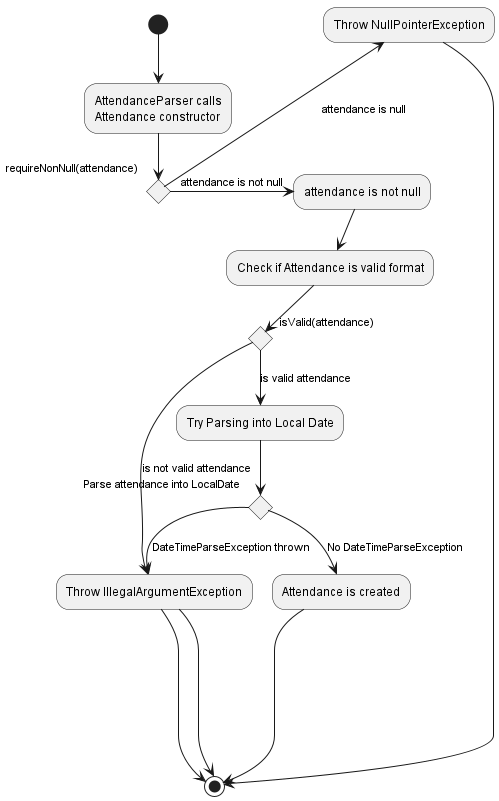
Below is the Activity diagram showing how a Session instance is created upon the Session class constructor being called.
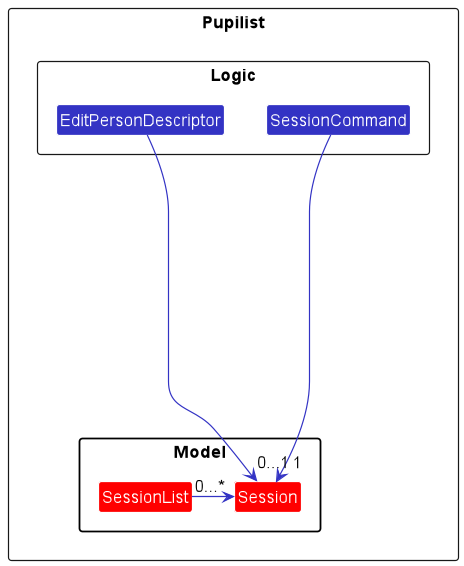
These operations are exposed in the Command interface through the SessionCommand class, the EditPersonDescriptor class and SessionList class.
Below is the partial class diagram aimed at showing the dependencies of the Session class with other classes of the Pupilist code base.
Given below is an example usage scenario and how the Session class behaves at each step.
Assumption: There are Person instances of the name Benson Meier and Alice Pauline Person list.
Step 1. The user executes a view benson meier command which puts the Person with the name Benson Meier in view mode. Assume that the Person has a SessionList of size >= 3.
Step 2. The user executes an edit s/1 Mon 08:30 command which edits the index 0 of the SessionList displayed on the GUI. This creates a new Session instance with the string input of the format EEE HH:mm.
The Session instances in the SessionList of the Person is immediately sorted using the Session class compareTo implementation.
Step 3. The user executes a session 1 s/ Tue 09:00 command which creates a new instance of Session with the string input of the format EEE HH:mm and adds it to the SessionList of the Person of the first Person Card shown in the GUI.
The Session instances in the modified SessionList of the Person is immediately sorted using the Session class compareTo implementation.
Step 4. The user executes a view Alice Pauline command which puts the Person with the name Alice Pauline in view mode.
Step 5. The user executes a remove s/3 command which removes the instance of Session in index 2 of the SessionList of the Person (since SessionList implementation uses zero-based indexing) displayed in the GUI in view mode. The Session
instances in the SessionList of the Person in view are then immediately sorted using the Session class compareTo implementation.
Design considerations
Aspect: How to encapsulate user input in Session
-
Alternative 1 (current choice): Use defaulting of
LocalDateTimeFormatteras formatter forLocalDateTime.- Pros: Easier to implement, uses only one imported Java class
LocalDateTimefor encapsulating user input. - Cons: Have to default to a Black Box year, month and week which is a workaround.
- Pros: Easier to implement, uses only one imported Java class
-
Alternative 2: Use of extra
DayOfWeekclass alongsideLocalDateTime.- Pros: Less of a workaround. More accurate backstage representation of user input.
- Cons: Harder to implement. Have to concatenate
DayOfWeekandLocalDateTimeintoStringmethod, which may affect performance with a largeSessionList.
Attendance Feature
Implementation
The attendance feature is facilitated by AttendanceCommand, AttendanceList and AttendanceList classes.
AttendanceCommand extends Command abstract class that has abstract method, execute().
Attendance deals with the actual attendance inputs while the
AttendanceList deals with the list of Attendance.
The AttendanceList is the object that is displayed in the AddressBook.
Additionally, the classes implement the following operations:
-
AttendanceList#addAttendance(Attendance)- Adds attendance to the attendance list. -
AttendanceList#clearList()- Clears all stored attendance of the Person -
AttendanceList#editAtIndex(index)- Edits the attendance at the given index with the new given attendance.
These operations are exposed in command executions such as AttendanceCommand#execute() and EditCommand#createEditedPerson().
Attendance#clearList() is used for testing purposes only.
Given below is an example usage scenario and how the adding attendance mechanism behaves at each step.
Step 1. The user launches the application for the first time. The address book will be initialized with the initial address book state.
Step 2. The user executes attendance 1 a/2022-08-08 to add attendance to the first Person’s attendance list in the address book.
The Attendance command calls AttendanceList#addAttendance(Attendance) and adds the task to the list.
The following sequence shows how adding attendance works:
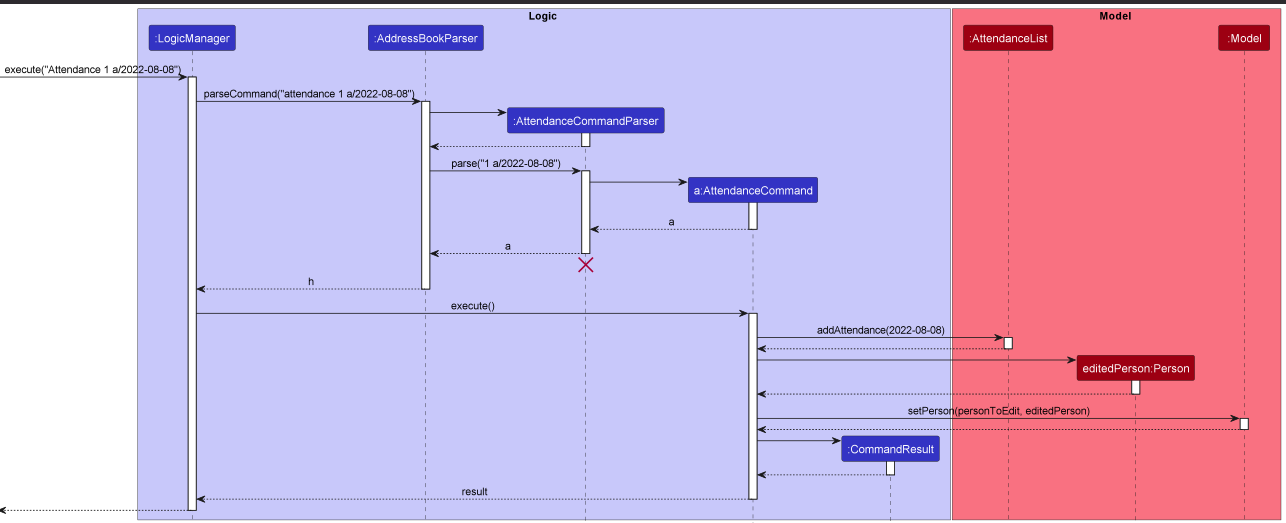
AttendanceCommandParser should end at the destroy marker (X) but due to a limitation of PlantUML, the lifeline reaches the end of diagram.
Step 3. The user decides to edit the attendance to 2022-08-12 instead.
They go into full view mode with the view command and execute edit 1 a/2022-08-12, which calls AttendanceList#editAtIndex() and replaces the old description with the new one.
Design considerations
Aspect: Format of user input in Attendance
-
Alternative 1 (current choice): Use
LocalDateto encapsulate user input into aSession.- Pros: Easier to implement, uses only one imported Java class
LocalDatefor encapsulating user input and intuitive for user. - Cons: Cannot differentiate between
Sessiontimings on the same day. Hence, aPersonwho has twoSessionon the same day, who is present for one or the other cannot be differentiated.
- Pros: Easier to implement, uses only one imported Java class
-
Alternative 2: Use of
LocalDateTimeinstead ofLocalDate.- Pros: Able to differentiate
Attendancebetween twoSessiontimings on the same day. - Cons: Longer user input. This results in longer user input every time the user adds an
Attendanceto aPerson. May result in cumulative inconvenience over a long period of time. Can be solved by initial implementation by adding twoAttendance.
- Pros: Able to differentiate
Remove feature
Implementation
The remove feature allows the user to remove a specified detail from the homework, session, attendance, or grade progress lists. It can only be used when the user is in the ‘view’ state of the student.
Remove is facilitated by the RemoveCommand in the Logic component. It extends command.
Given below is an example usage scenario and how the Remove mechanism behaves at each step.
Assumption: There are Person instances of the name Benson Meier in the Person list.
Step 1. The user launches the application for the first time. The AddressBook will be initialized with the sample data and
each person in the AddressBook contains details for each GradeProgress, Session, Attendance or Homework object.
Step 2. The user executes view Benson Meier,bringing the user to the view state of Benson Meier
Step 3. The user executes a remove a/3 command. The following methods are called in the given order:
-
LogicManager#Execute, which then calls -
AddressBookParser#parseCommand. It will parse the input as aRemoveCommandand call the constructor ofRemoveCommandParser. -
RemoveCommandParser#parsewill parse the user command based on the prefixes given by the user, and returns aRemoveCommandwithRemovePersonDescriptoras input. -
RemoveCommand#executeis called, and it will check if the user is inview state. If not, it will throw aCommandExceptionwithMESSAGE_NOT_VIEW_MODE. Otherwise, the method continues to run. - The
RemoveCommand#createRemovedPersoncreates a person using the information in theRemovePersonDescriptor. - The
Personis replaced by the newly createdPersonusingModel#setPerson.RemoveCommand#executereturns aCommandResultto theLogicManager.
The following activity diagram summarises what happens when a user executes the Remove command:
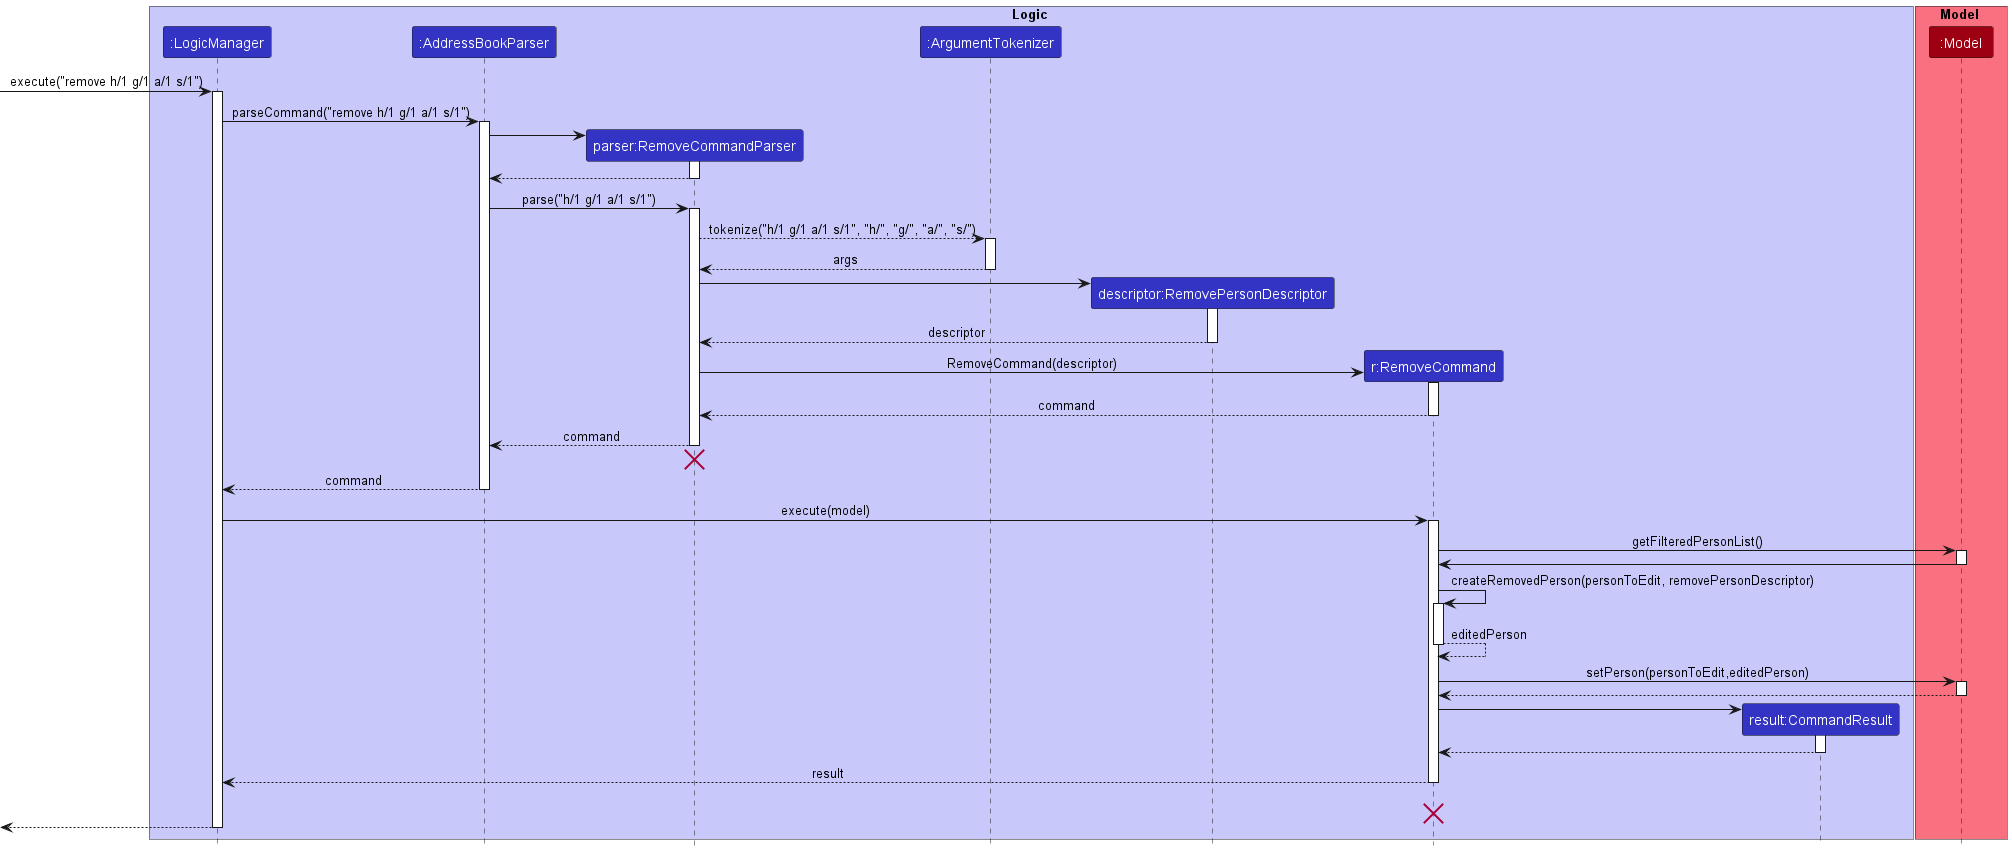
RemoveCommandParser should end at the destroy marker (X) but due to a limitation of PlantUML, the lifeline reaches the end of diagram.
Design considerations
Aspect: Where to implement Remove function
-
Alternative 1 (current choice): Have a dedicated function for removing specified details of a Person from the various lists in their details.
- Pros: Easier to implement
- Cons: Less intuitive, users must know difference between
editandremovefunctions
-
Alternative 2: Integrate remove function into edit function.
- Pros: More intuitive as removing a feature is also instinctively understood as editing details.
- Cons: Harder to implement, can lead to potential errors if user means to edit as opposed to remove
-
Alternative 3: No Remove command. Users are unable to remove fields added to student’s lists, and have to edit the existing fields instead.
- Pros: Less bug-prone, more convenient for developers
- Cons: Not user-friendly and makes things difficult for users.
Mark & Unmark Feature
Implementation
The mark feature allows the user to mark a specified item from the homework or attendance list.
The unmark feature allows the user to unmark a specified item from the homework or attendance list.
Both mark and unmark features can only be used when the user is in the view state of the student.
The mark feature is facilitated by MarkCommand and MarkPersonDescriptor which is an associated class.
The unmark feature is faciliatated by UnmarkCommand and MarkPersonDescriptor which is an associated class.
Each MarkCommand and UnmarkCommand contains one and only one MarkPersonDescriptor object. Below is a partial class diagram of the relationship.

Both MarkCommand and UnmarkCommand extends Command abstract class that has abstract method, execute().
MarkPersonDescriptor class stores the details to mark/unmark the person with.
Additionally, the classes implement the following methods
-
MarkCommmand#createMarkedPerson- creates a person object with marked field as specified by the command. -
MarkCommand#getUpdatedHomeworkList- creates an updated homework list. -
MarkCommand#getUpdatedAttendanceList- creates an updates attendance list.
To enable the marking behaviour, following methods have been implemented
-
Attendance#markAsPresent- sets theisPresentattribute astrue -
AttendanceList#markAtIndex- sets theisPresentattribute of the object in the list specified by the index astrue -
Homework#markAsDone- sets theisDoneattribute astrue -
HomeworkList#markAtIndex- sets theisDoneattribute of the object in the list specified by the index astrue
To enable the unmarking behaviour, following methods have been implemented
-
Attendance#markAsAbsent- sets theisPresentattribute asfalse -
AttendanceList#unmarkAtIndex- sets theisPresentattribute of the object in the list specified by the index asfalse -
Homework#markAsUndone- sets theisDoneattribute asfalse -
HomeworkList#unmarkAtIndex- sets theisDoneattribute of the object in the list specified by the index asfalse
Given below is an example usage scenario of how the user can mark a specified item from the homework or attendance list.
Step 1. The user launches the application. The AddressBook will be initialized with the initial address book state.
Step 2. The user executes view Alex Yeoh, which would show the details of the person only.
Step 3. The user executes mark h/1, which would then mark the homework of index 1 in Alex Yeoh’s homework list.
The following sequence diagram shows how the MarkCommand works:

MarkCommandParser should end at the destroy marker (X) but due to a limitation of PlantUML, the lifeline reaches the end of diagram.
Design considerations
Aspect: How mark and unmark command executes
-
Alternative 1 (current choice): Use of PersonDescriptors for identifying and marking/unmarking of fields
- Pros: Able to identify the various 2 fields and do the necessary updates where needed
- Cons: More code to implement which would mean it is more susceptible to bugs
-
Alternative 2: Do direct marking of lists through invoking of marking methods of the specified field
- Pros: Less bug-prone, easier to implement
- Cons: Marking/unmarking might be limited to only one field
Schedule feature
Implementation
The session feature is facilitated by ShowCommand and TimeSlot which is an association class. Each TimeSlot contains a Person and a Session.
Below is a partial class diagram of the relationship:

Given below is an example usage scenario of how the user can view the schedule by day:
Step 1. The user launches the application for the first time. The AddressBook will be initialized with the initial address book state.
Step 2. The user executes session 1 s/Mon 12:30, adding a session time to the first person in the list.
Step 3. The user executes a show Mon command which displays a list of persons with sessions on Monday.
The following sequence shows how viewing the schedule works:
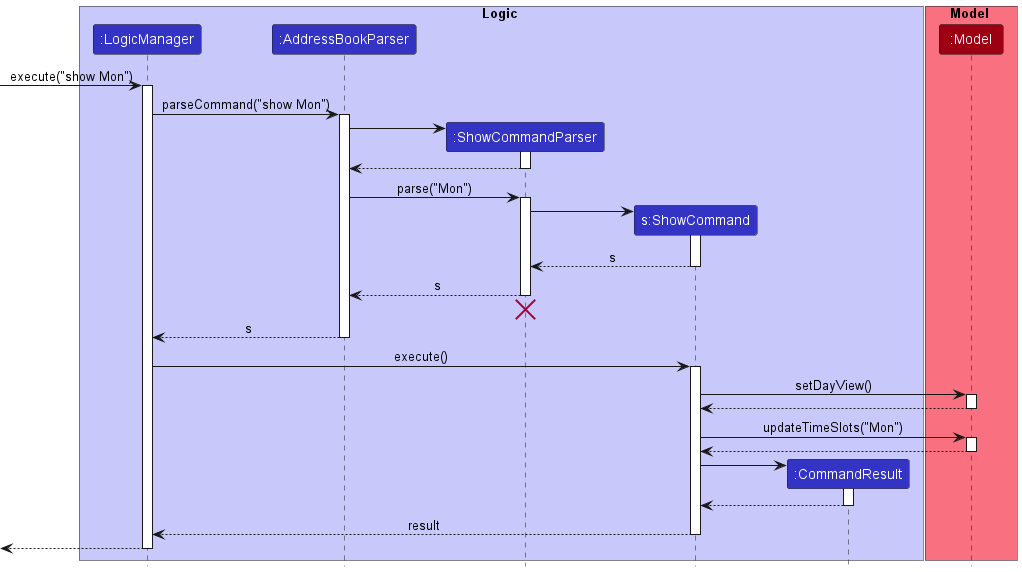
ShowCommandParser should end at the destroy marker (X) but due to a limitation of PlantUML, the lifeline reaches the end of diagram.
Design considerations
Aspect: Retrieval of individual sessions
-
Alternative 1 (current choice): An association class between
SessionandPerson- Pros: Simple to retrieve a
Personand aSessionwhen bound together - Cons: Association has to be explicitly added and created when needed instead of existing throughout
- Pros: Simple to retrieve a
-
Alternative 2: Bidirectional navigability
- Pros: Easy to identify the corresponding
Personfor eachSession - Cons: Increases coupling
- Pros: Easy to identify the corresponding
Aspect: Populating of TimeSlot objects
-
Alternative 1 (current choice): Populated and retrieved only when user inputs
show- Pros: Lesser things to store and keep track of, easier to implement
- Cons: Has to iterate through the list multiple times if user enters the command multiple times without making changes to the session timings
-
Alternative 2: Global list that gets updated each time a session changes
- Pros: Easy to retrieve list of time slots
- Cons: Unnecessary storing as it only depends on
SessionandPersonwhich are both already stored, have to constantly update wheneverSessionListis updated.
[Proposed] Undo/redo feature
Proposed Implementation
The proposed undo/redo mechanism is facilitated by VersionedAddressBook. It extends AddressBook with an undo/redo history, stored internally as an addressBookStateList and currentStatePointer. Additionally, it implements the following operations:
-
VersionedAddressBook#commit()— Saves the current address book state in its history. -
VersionedAddressBook#undo()— Restores the previous address book state from its history. -
VersionedAddressBook#redo()— Restores a previously undone address book state from its history.
These operations are exposed in the Model interface as Model#commitAddressBook(), Model#undoAddressBook() and Model#redoAddressBook() respectively.
Given below is an example usage scenario and how the undo/redo mechanism behaves at each step.
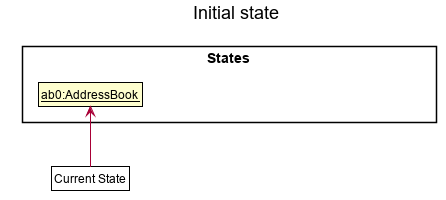
Step 1. The user launches the application for the first time. The VersionedAddressBook will be initialized with the initial address book state, and the currentStatePointer pointing to that single address book state.
Step 2. The user executes delete 5 command to delete the 5th person in the address book. The delete command calls Model#commitAddressBook(), causing the modified state of the address book after the delete 5 command executes to be saved in the addressBookStateList, and the currentStatePointer is shifted to the newly inserted address book state.

Step 3. The user executes add n/David … to add a new person. The add command also calls Model#commitAddressBook(), causing another modified address book state to be saved into the addressBookStateList.
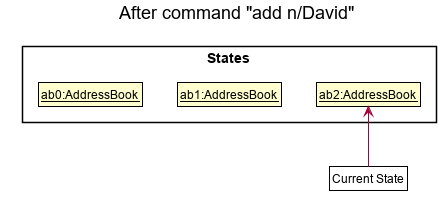
Model#commitAddressBook(), so the address book state will not be saved into the addressBookStateList.
Step 4. The user now decides that adding the person was a mistake, and decides to undo that action by executing the undo command. The undo command will call Model#undoAddressBook(), which will shift the currentStatePointer once to the left, pointing it to the previous address book state, and restores the address book to that state.
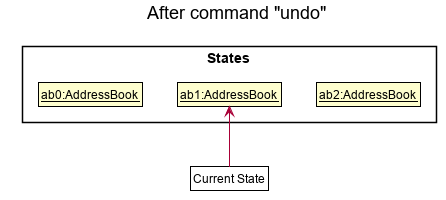
currentStatePointer is at index 0, pointing to the initial AddressBook state, then there are no previous AddressBook states to restore. The undo command uses Model#canUndoAddressBook() to check if this is the case. If so, it will return an error to the user rather
than attempting to perform the undo.
The following sequence diagram shows how the undo operation works:
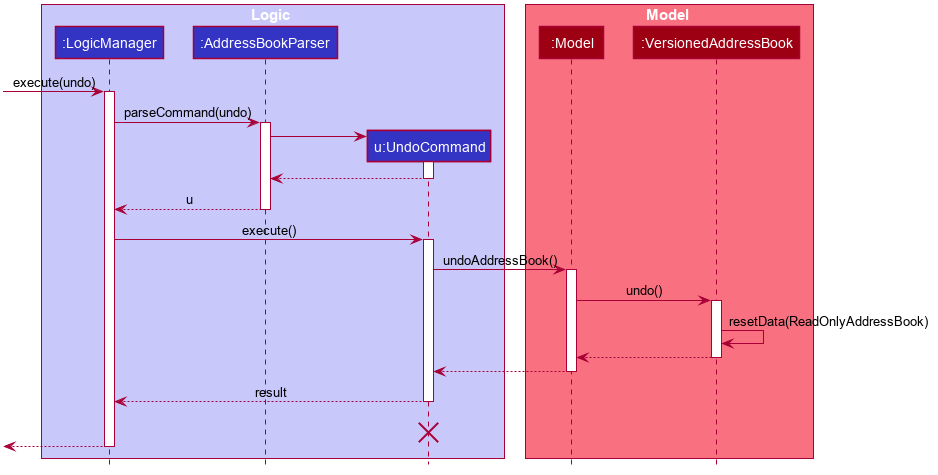
UndoCommand should end at the destroy marker (X) but due to a limitation of PlantUML, the lifeline reaches the end of diagram.
The redo command does the opposite — it calls Model#redoAddressBook(), which shifts the currentStatePointer once to the right, pointing to the previously undone state, and restores the address book to that state.
currentStatePointer is at index addressBookStateList.size() - 1, pointing to the latest address book state, then there are no undone AddressBook states to restore. The redo command uses Model#canRedoAddressBook() to check if this is the case. If so, it will return an error to the user rather than attempting to perform the redo.
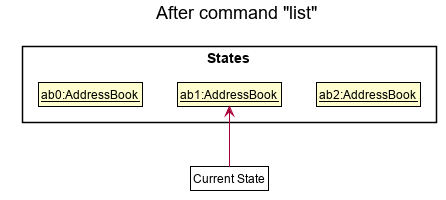
Step 5. The user then decides to execute the command list. Commands that do not modify the address book, such as list, will usually not call Model#commitAddressBook(), Model#undoAddressBook() or Model#redoAddressBook(). Thus, the addressBookStateList remains unchanged.
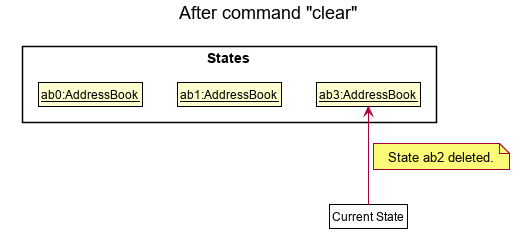
Step 6. The user executes clear, which calls Model#commitAddressBook(). Since the currentStatePointer is not pointing at the end of the addressBookStateList, all address book states after the currentStatePointer will be purged. Reason: It no longer makes sense to redo the add n/David … command. This is the behavior that most modern desktop applications follow.
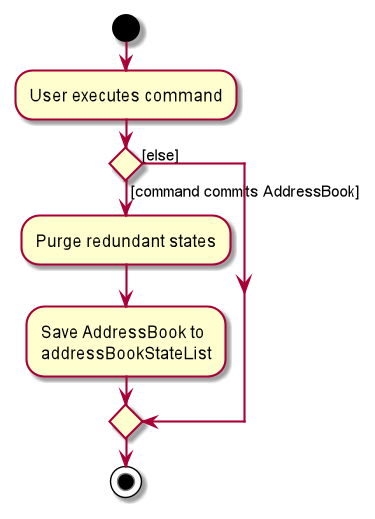
The following activity diagram summarizes what happens when a user executes a new command:
Design considerations
Aspect: How undo & redo executes:
-
Alternative 1 (current choice): Saves the entire address book.
- Pros: Easy to implement.
- Cons: May have performance issues in terms of memory usage.
-
Alternative 2: Individual command knows how to undo/redo by
itself.
- Pros: Will use less memory (e.g. for
delete, just save the person being deleted). - Cons: We must ensure that the implementation of each individual command are correct.
- Pros: Will use less memory (e.g. for
Documentation, logging, testing, configuration, dev-ops
Appendix: Requirements
Product scope
Target user profile:
- has a need to organise and manage their students and lesson plans
- has a need to keep track of their students’ assigned workload
- has a need to keep track of their students’ grades progress
- has a need to keep track of their students’ attendance in lessons
- has a need to keep track of their student’s assignment progress
- has a need to keep track of their student’s time slots
- has a need to keep track of their homework assignments for their students
- has a need to access and organise their students contact details
- prefer an all-in-one solution to organise their lesson plans and students
- prefer desktop apps over other types
- can type fast
- prefers typing to mouse interactions
- is reasonably comfortable using CLI apps
Value proposition: manage and organise students and lesson plans in a lightweight and fast desktop application.
User stories
Priorities: High (must have) - * * *, Medium (nice to have) - * *, Low (unlikely to have) - *
| Priority | As a … | I want to … | So that I can… |
|---|---|---|---|
* * * |
potential user | see the app populated with sample data | see how the app would look like after frequent usage |
* * * |
new user | purge all current data | restart with a new set of data for |
* * * |
new user | be able to view all the basic commands of the app | I can pick them up quickly to start using the app |
* * * |
user | assign homework to my students | keep track of the work I assigned to them |
* * * |
user | mark my students attendance | keep track of my students’ attendance |
* * * |
user | modify my students’ grade progress | keep track on how well my students’ are doing |
* * * |
user with many students to manage | add my students’ time slots | keep track of my daily schedule |
* * * |
user with many students to manage | view a list of all my students and their work-related info | I can see my students’ workload at a glance |
* * * |
long-term user with many students | update my students data easily | I can keep updated information relevant to their work and contact |
* * * |
long-term user | view grade and assignment progress of my individual students | keep track of my students progress |
Use cases
(For all use cases below, the System is the Pupilist and the Actor is the user, unless specified otherwise)
Use case: Mark attendance
MSS
- User requests to view a student.
- Pupilist shows the Student name and his attendance record.
- User chooses to mark an index of the student’s attendance record.
-
Pupilist tells User that the command is successful.
Use case ends.
Extensions
- 1a. No Student specified found.
- 1a1. Pupilist tells user no such student found. Use case resumes at step 1
Use case: View students’ information
- User requests to list students by their user-specified tagged information.
-
Pupilist shows a list of students names along with the requested information.
Use case ends.
Extensions
- 1a. The list is empty.
-
1a1. Pupilist shows an empty list
Use case ends.
-
- 2a. Invalid information tag request.
-
2a1. Pupilist shows error to indicate invalid command.
Use case ends.
-
Use case: Delete a person
MSS
- User requests to list persons
- Pupilist shows a list of persons
- User requests to delete a specific person in the list
-
Pupilist deletes the person
Use case ends.
Extensions
-
2a. The list is empty.
Use case ends. -
3a. The given index is invalid.
-
3a1. Pupilist shows an error message.
Use case resumes at step 2.
-
Use case: Add homework
MSS
- User requests to list students
- Pupilist shows a list of students
- User requests assign homework to a specific student in the list
-
Pupilist adds homework to the student
Use case ends.
Extensions
-
2a. The list is empty.
Use case ends.
-
3a. The homework description is invalid.
-
3a1. Pupilist shows an error message.
Use case resumes at step 2.
-
-
3b. The given index is invalid.
-
3b1. Pupilist shows an error message.
Use case resumes at step 2.
-
Use case: Add lesson plan
MSS
- User requests to list students.
- Pupilist shows a list of students.
- User requests to add a lesson plan to a specific student.
-
Pupilist adds a lesson plan to the student.
Use case ends.
Extensions
- 3a. The lesson plan description is invalid.
-
3a1. Pupilist shows an error message.
Use case resumes at step 2.
-
-
3b. Pupilist detects an error in the selected index.
-
3b1. Pupilist displays an error message.
Use case resumes at step 3.
-
Use case: Remove homework
MSS
- User requests to view a student.
- Pupilist shows the student’s name and details.
- User chooses to remove an index of the student’s homework.
-
Pupilist tells User that the command is successful.
Use case ends.
Extensions
- 1a. No Student specified found.
- 1a1. Pupilist tells user no such student found. Use case resumes at step 1
-
3a. The given index is invalid.
-
3a1. Pupilist shows an error message.
Use case resumes at step 3.
-
Non-Functional Requirements
- Should work on Windows or Linux OS as long as it has Java 11 installed.
- Should work on 64-bit environments.
- The system should be usable by a novice who has never used an app to organize their students before.
- The system should respond within a second.
- The product is not required to handle communication between teacher and student.
Glossary
- Attendance: The date of the lesson attended
- Card: The details of a student
- Grade Progress: The current grade of the student and their standard of work
- Homework: Work assigned to a student and whether or not they completed it
- Lesson plan: What the tutor intends to teach each student such as a subject or topic
- Mainstream OS: Windows, Linux, Unix, OS-X
- Session: The time slot allocated to a student
- Schedule: The students and time slots scheduled for a particular day
Appendix: Instructions for manual testing
Given below are instructions to test the app manually.
Launch and shutdown
- Initial launch
- Download the jar file and copy into an empty folder
- Double-click the jar file Expected: Shows the GUI with a set of sample contacts. The window size may not be optimum.
- Saving window preferences
- Resize the window to an optimum size. Move the window to a different location. Close the window.
- Re-launch the app by double-clicking the jar file.
Expected: The most recent window size and location is retained.
Adding a student
- Adding a student to the list
- Prerequisites: App must be in either list or view mode.
- Test case:
add n/Alice Goh p/87654321 lp/Science
Expected: Student with the specified details is added. Details of added student in status message. - Test case:
add n/Alice Ho
Expected: No student is added. Error details shown in the status message. - Other incorrect add commands to try:
add,add p/12345678,add 1
Expected: Similar to previous.
Adding of grade progress to student
- Adding grade progress to a student in
Pupilist- Prerequisites: List all persons using the
listcommand. Multiple persons in the list. - Test case:
grade 1 g/Math: A
Expected:Math: Awill be added to the grade progress of the student in the first index in the list. - Test case:
grade g/Math: A
Expected: Grade is not added to any persons. Error details shown in the status message. - Other incorrect commands to try:
grade,grade 1 g/
Expected: Similar to previous.
- Prerequisites: List all persons using the
Adding homework to a student
- Adding homework to a student while all students are being shown in list mode
- Prerequisites: List all students using the
listcommand. Multiple students in the list. - Test case:
hw 1 h/Science worksheet
Expected: “Science worksheet” homework is added to the first student. Details of updated contact shown in the status message. - Test case:
hw 1
Expected: No homework is added. Error details shown in the status message. - Other incorrect homework commands to try:
hw,hw 0,hw 1 h/
Expected: Similar to previous.
- Prerequisites: List all students using the
- Adding homework to a student while in view mode
- Prerequisites: View a single student using the
viewcommand, e.g.view Alex Yeoh. Only one person. - Test case:
hw 1 h/Math worksheet
Expected: “Math worksheet” homework is added to the student. Details of updated contact shown in the status message. - Test case:
hw 2 h/Math worksheet
Expected: No homework is added. Error details shown in the status message. - Other incorrect homework commands to try: Similar to adding homework while all students are shown in list mode.
Expected: Similar to previous.
- Prerequisites: View a single student using the
Updating lesson plan of a student
- Updating lesson plan of a student while all students are being shown in list mode
- Prerequisites: List all students using the
listcommand. Multiple students in the list. - Test case:
lesson 1 lp/Biology
Expected: Lesson plan of first contact is updated to “Biology”. Details of the updated contact shown in the status message. - Test case:
lesson 3 lp/Algorithms
Expected: Lesson plan of third contact is updated to “Algorithms”. Details of the updated contact shown in the status message. - Test case:
lesson 1 lp/
Expected: No lesson plan is updated. Error details shown in the status message. - Other incorrect lesson commands to try:
lesson,lesson 1,lesson x,...(where x is larger than the list size)
Expected: Similar to previous.
- Prerequisites: List all students using the
Editing a student
- Editing a student while in view mode
- Prerequisites: App is in view mode of a student.
- Test case:
edit n/Alice Tan
Expected: First contact is deleted from the list. Details of the edited contact shown in the status message. - Test case:
edit 1 n/Alice Tan
Expected: No student is edited. Error details shown in the status message. - Other incorrect edit commands to try:
edit,edit 1,edit lp/
Expected: Similar to previous.
Viewing a student
- Viewing a student while all students are being shown
- Prerequisites: App must be in either view or list mode. Contact named Alex Yeoh exists. No contact named 0 exists.
- Test case:
view Alex yeoh
Expected: Contact named Alex Yeoh is displayed in full view mode. No other contacts are displayed. - Test case:
view 0
Expected: No student is deleted. App returns to list mode. Error details shown in the status message. - Other incorrect view commands to try:
view
Expected: Similar to previous.
Showing a schedule of a day
- Showing a schedule while in list or view mode
- Prerequisites: At least one student has a session added to them. At least one of the sessions added is on Monday.
- Test case:
show Mon
Expected: List of session times on Monday is displayed. - Test case:
show abc
Expected: No schedule is shown. Error details shown in the status message. - Other incorrect show commands to try:
show,show tues
Expected: Similar to previous.
Removing field from student
- Removing a field from a student in
Pupilist.- Prerequisite: Display the person whose field is to be removed using the
viewcommand. Only one person is displayed. Person displayed has only one session in his session list. All other lists are empty. - Test case:
remove s/1
Expected: First session is removed from the session list of the person displayed. - Test case:
remove h/1
Expected: No field is removed. Error details shown in the status message. - Other incorrect remove commands to try:
remove,remove a/x,remove h/x, andremove g/x(where x is larger than the list size)
Expected: Similar to previous.
- Prerequisite: Display the person whose field is to be removed using the
- Removing a field from a student in
Pupilist.- Prerequisite: List all the persons using the
listcommand. Multiple persons in the list. - Test case:
remove s/1
Expected: No field is removed. Error details shown in the status message. Status bar remains the same. - Other incorrect remove commands to try:
remove a/y,remove h/y,remove g/y(y can be any integer or string)
Expected: Similar to previous.
- Prerequisite: List all the persons using the
Marking a student
- Marking a student in
Pupilist- Prerequisite: Display the person to be mark using the
viewcommand. Only one person is displayed. Person displayed has only one homework in his homework list. - Test case:
mark h/1
Expected: First homework is marked as completed in the homework list of the person displayed. - Test case:
mark g/1
Expected: No field is marked. Error details shown in the status message. - Other incorrect mark commands to try:
mark,mark a/x,mark h/xandmark 1242(where x is larger than the list size)
Expected: Similar to previous.
- Prerequisite: Display the person to be mark using the
- Marking a student in
Pupilist- Prerequisite: List all persons using the
listcommand. Multiple persons in the list. - Test case:
mark h/1
Expected: No person is marked. Error details shown in the status message. Status bar remains the same. - Other incorrect mark commands to try:
mark a/y,mark h/y(y can be any integer or string)
Expected: Similar to previous.
- Prerequisite: List all persons using the
Unmarking a student
- Unmarking a student in
Pupilist- Prerequisite: Display the person to be mark using the
viewcommand. Only one person is displayed. Person displayed has only one homework in his homework list. - Test case:
unmark h/1
Expected: First homework is marked as uncompleted in the homework list of the person displayed. - Test case:
unmark g/1
Expected: No field is marked. Error details shown in the status message. - Other incorrect unmark commands to try:
unmark,unmark a/x,unmark h/xandunmark 1242(where x is larger than the list size)
Expected: Similar to previous.
- Prerequisite: Display the person to be mark using the
- Unmarking a student in
Pupilist- Prerequisite: List all persons using the
listcommand. Multiple persons in the list. - Test case:
unmark h/1
Expected: No person is unmarked. Error details shown in the status message. Status bar remains the same. - Other incorrect unmark commands to try:
unmark a/y,unmark h/y(y can be any integer or string)
Expected: Similar to previous.
- Prerequisite: List all persons using the
Deleting a student
- Deleting a student while all persons are being shown
- Prerequisites: List all students using the
listcommand. Multiple students in the list. - Test case:
delete 1
Expected: First contact is deleted from the list. Details of the deleted contact shown in the status message. - Test case:
delete 0
Expected: No student is deleted. Error details shown in the status message. - Other incorrect delete commands to try:
delete,delete x,...(where x is larger than the list size)
Expected: Similar to previous.
- Prerequisites: List all students using the
Next Session feature
- Viewing the next session timing and student to attend to.
- Prerequisite: Multiple persons in the unfiltered list. Reference time for
Pupilistto check as base time isMon 00:00. There are multiple persons with different session timings.
One person with nameAlex Yeohhas a session timing ofMon 07:00and is the closest session to the current time (reference time) ofMon 00:00. - Test case:
list
Expected: Status message showsListed all persons \n next Session: Alex Yeoh Mon 07:00 - Prerequisite: No person with a session timing.
- Test case:
list
Expected: Status message showsListed all persons \n No next Session timing! - Other cases to try: on launch of application next session feedback to user in status message.
Expected: Similar to previous.
- Prerequisite: Multiple persons in the unfiltered list. Reference time for
Adding of attendance to student
- Adding attendance to a student in
Pupilist- Prerequisites: List all persons using the
listcommand. Multiple persons in the list. - Test case:
attendance 1 a/2022-08-08
Expected:2022-08-08will be added to the attendance of the student in the first index in the list. It will be marked as absent by default and displayed as2022-08-08 [Absent]. - Test case:
attendance a/2022-08-08
Expected: Grade is not added to any persons. Error details shown in the status message. - Other incorrect commands to try:
attendance,attendance 1 a/. Expected: Similar to previous.
- Prerequisites: List all persons using the
Adding of session to student
- Adding session to a student in
Pupilist- Prerequisites: List all persons using the
listcommand. Multiple persons in the list. - Test case:
session 1 s/Mon 09:00
Expected:Mon 09:00will be added to the attendance of the student in the first index in the list. - Test case:
session 1 s/Thur 09:00
Expected: Session is not added to any persons. Error details shown in the status message. - Test case:
session 1 s/Thur 25:00
Expected: Session is not added to any persons. Error details shown in the status message. - Test case:
session s/Thu 09:00
Expected: Session is not added to any persons. Error details shown in the status message. - Other incorrect commands to try:
session,session 1 a/. Expected: Similar to previous.
- Prerequisites: List all persons using the